虚拟文件系统 — Deep Agents 的 Context Engineering 核心
上一章我们跑通了第一个 Deep Agent。本章深入 Deep Agents 最核心的创新——虚拟文件系统。理解它,就理解了 Deep Agents 区别于其他 Agent 框架的根本设计哲学。
为什么用”文件系统”管理上下文?
在第 1 章中我们提到,传统的 Agent 开发有一个致命问题:所有信息都直接塞进 prompt。文件内容、搜索结果、中间计算——全部挤在一个不断膨胀的对话历史里。
Deep Agents 的解决方案是:给 Agent 一个文件系统。
这个思路其实很符合直觉——想想你自己是怎么工作的:
- 你不会把所有资料同时打开铺在桌面上
- 你会把资料分门别类存放,需要时再取出来
- 你会用搜索快速定位需要的内容
- 你会在便签纸上记录中间结果
Deep Agents 让 Agent 也能这样工作。它提供了一整套文件操作工具,Agent 可以像人类一样按需读取、结构化存储、搜索定位。
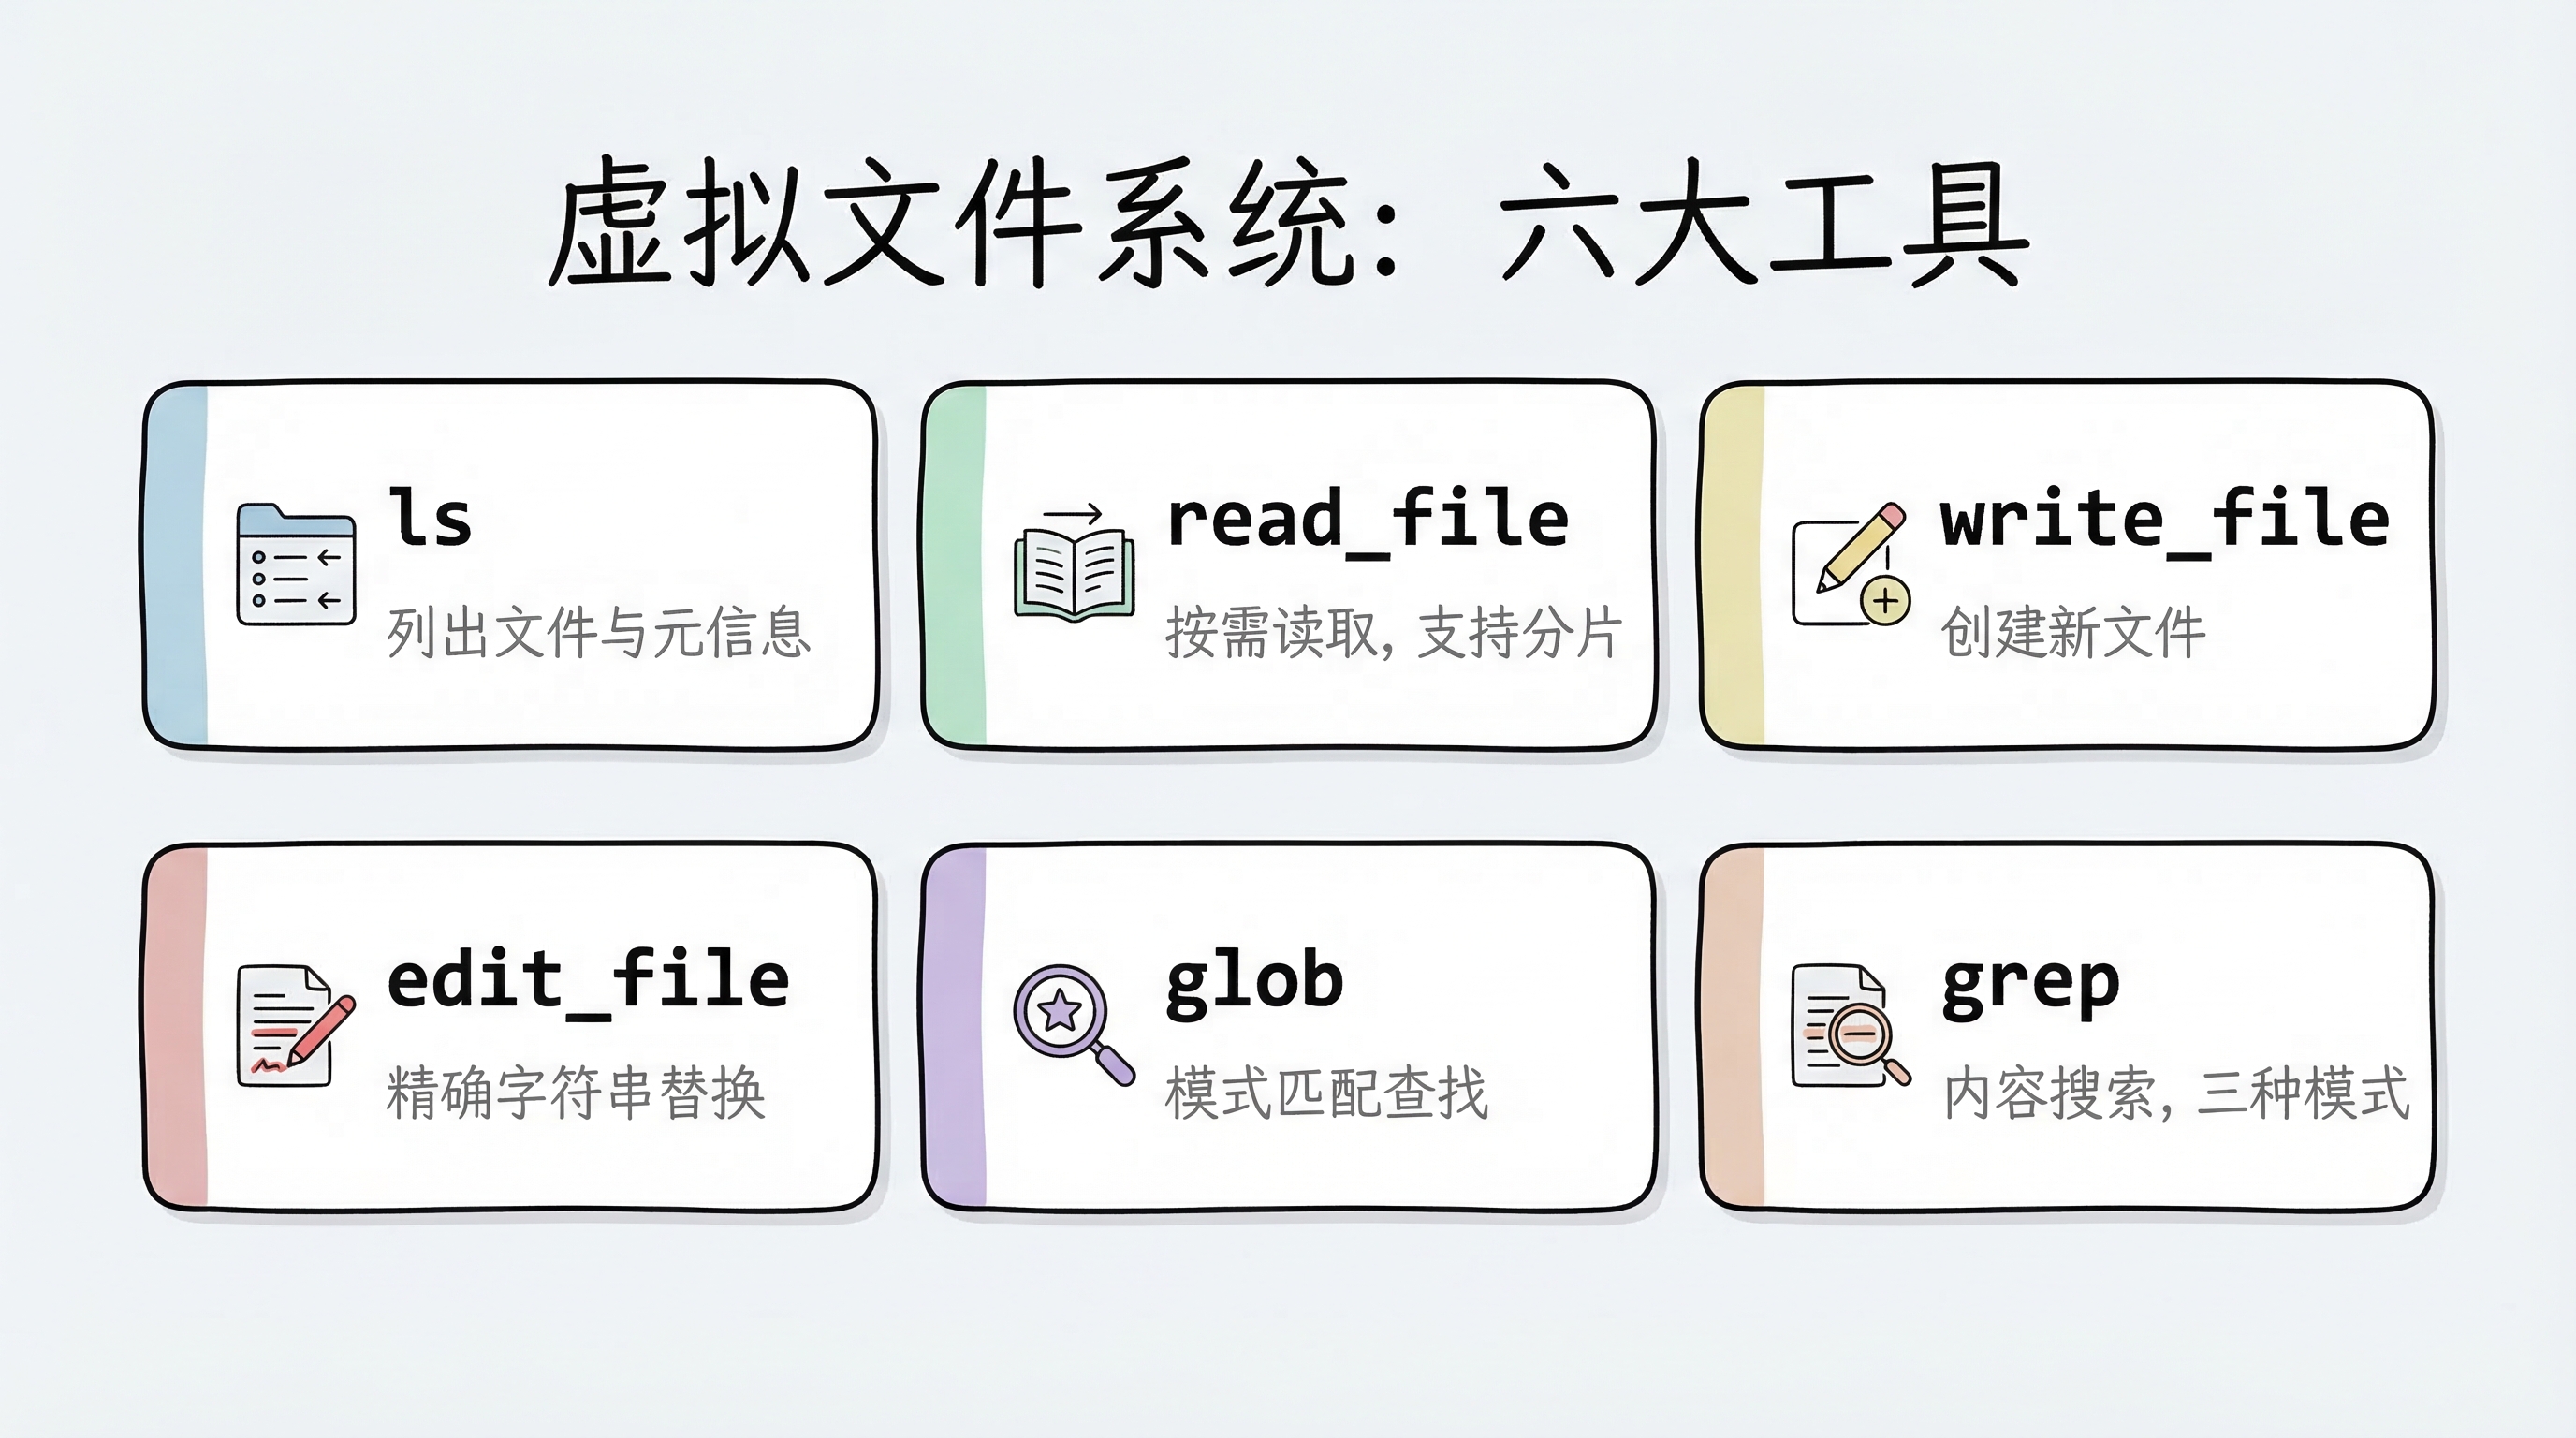
六大文件系统工具
Deep Agents 的虚拟文件系统提供了 6 个核心工具:
| 工具 | 用途 | 类比 |
|---|---|---|
ls | 列出目录中的文件和元信息(大小、修改时间) | 打开文件夹看看有什么 |
read_file | 读取文件内容,支持偏移量和限制条数;原生支持多模态格式(图片、视频、音频、PDF/PPT) | 翻开某份资料阅读 |
write_file | 创建新文件 | 写一份新的备忘录 |
edit_file | 对已有文件做精确字符串替换 | 用红笔修改文档 |
glob | 按模式匹配查找文件(如 **/*.py) | 在文件柜中按标签找 |
grep | 搜索文件内容,支持正则、上下文、计数 | 全文检索 |
read_file:不只是”读文件”
read_file 有两个值得特别关注的特性。
特性一:分片读取
对于大文件,read_file 支持按偏移量和行数读取,避免一次性把整个文件塞进上下文:
# 读取整个文件(默认前 2000 行)
read_file("/workspace/report.md")

# 从第 100 行开始,读取 50 行
read_file("/workspace/report.md", offset=100, limit=50)
特性二:原生多模态支持
read_file 不只能读文本——它原生支持多种多媒体格式,直接返回多模态内容块,让 Agent 能”看到”图片、“听到”音频、“读懂”文档:
| 类型 | 支持格式 |
|---|---|
| 图片 | .png .jpg .jpeg .gif .webp .heic .heif |
| 视频 | .mp4 .mpeg .mov .avi .flv .mpg .webm .wmv .3gpp |
| 音频 | .wav .mp3 .aiff .aac .ogg .flac |
| 文档 | .pdf .ppt .pptx |
这意味着 Agent 可以直接处理截图、录音、演示文稿——不再局限于纯文本工作流。
grep:三种输出模式
grep 是 Agent 快速定位信息的利器。它支持三种输出模式:
files_with_matches:只返回匹配的文件路径(快速定位)content:返回匹配行及上下文(深入查看)count:返回匹配数量(概览统计)
# 找到所有包含 "TODO" 的 Python 文件
grep("TODO", glob="**/*.py", output_mode="files_with_matches")

# 查看匹配内容及前后 3 行上下文
grep("def create_agent", output_mode="content", context=3)
上下文自动管理:不只是存文件
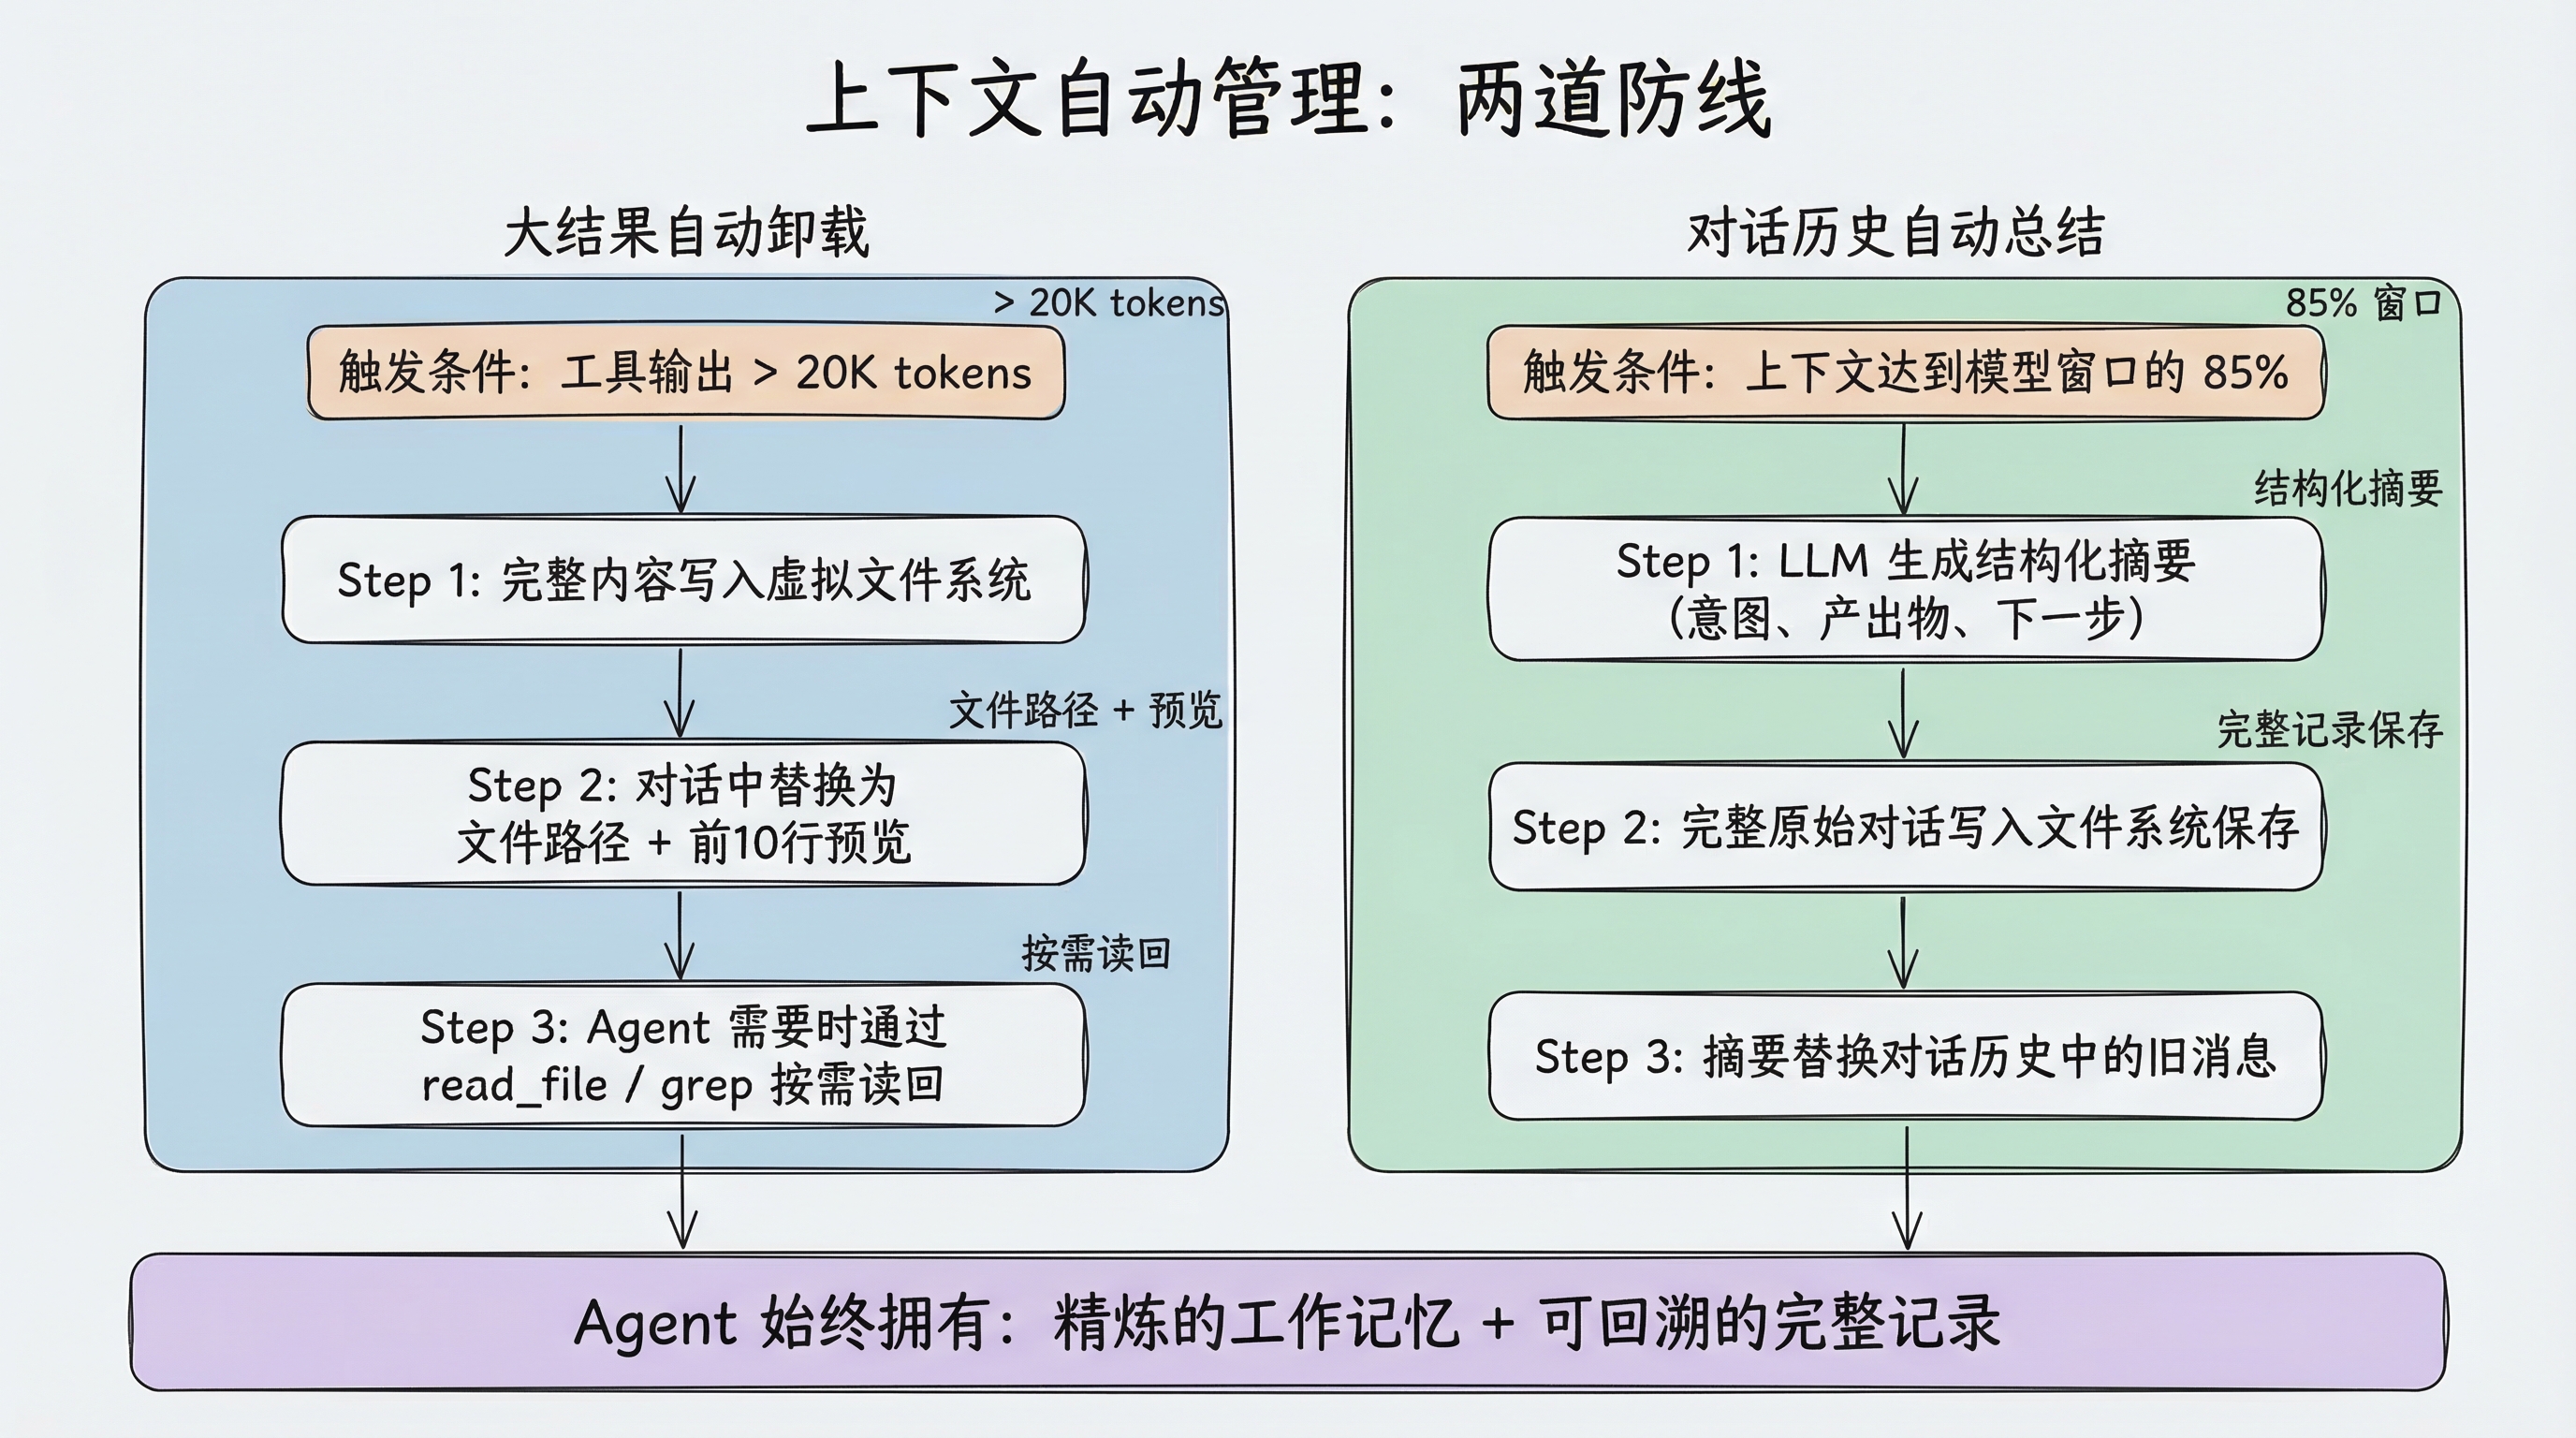
虚拟文件系统最大的价值不在于”存文件”本身,而在于它与 Deep Agents 的上下文自动管理机制紧密配合。
大结果自动卸载
当工具调用的输入或输出超过 20,000 tokens 时(可通过 tool_token_limit_before_evict 配置),Deep Agents 会自动:
- 将完整内容写入虚拟文件系统
- 在对话历史中替换为文件路径引用 + 前 10 行预览
- Agent 需要时可以按需读回
比如 Agent 调用搜索工具返回了大量结果:
原始结果:[50000 tokens 的搜索结果]

自动卸载后:
"结果已保存到 /workspace/search_results_001.md,
 前 10 行预览:
   1  # Search Results for 'LangGraph'
   2
   3  ## Result 1: Official Documentation
4 ..."这个机制是完全自动的——Agent 不需要手动管理,但可以随时通过 read_file 或 grep 重新访问完整内容。
对话历史总结
当上下文大小达到模型窗口的 85% 时,如果没有更多可卸载的内容,Deep Agents 会启动自动总结:
- 用 LLM 生成对话的结构化摘要(意图、产出物、下一步)
- 将完整的原始对话写入文件系统保存
- 用摘要替换对话历史中的旧消息
这种”双保险”设计意味着:Agent 既有精炼的工作记忆(摘要),又能在需要时回溯细节(文件系统中的完整记录)。
可插拔的存储后端
到目前为止我们讨论的”虚拟文件系统”是一个抽象概念。具体的文件存到哪里,由**后端(Backend)**决定。
Deep Agents 的后端是可插拔的——你可以根据场景选择不同的存储策略。
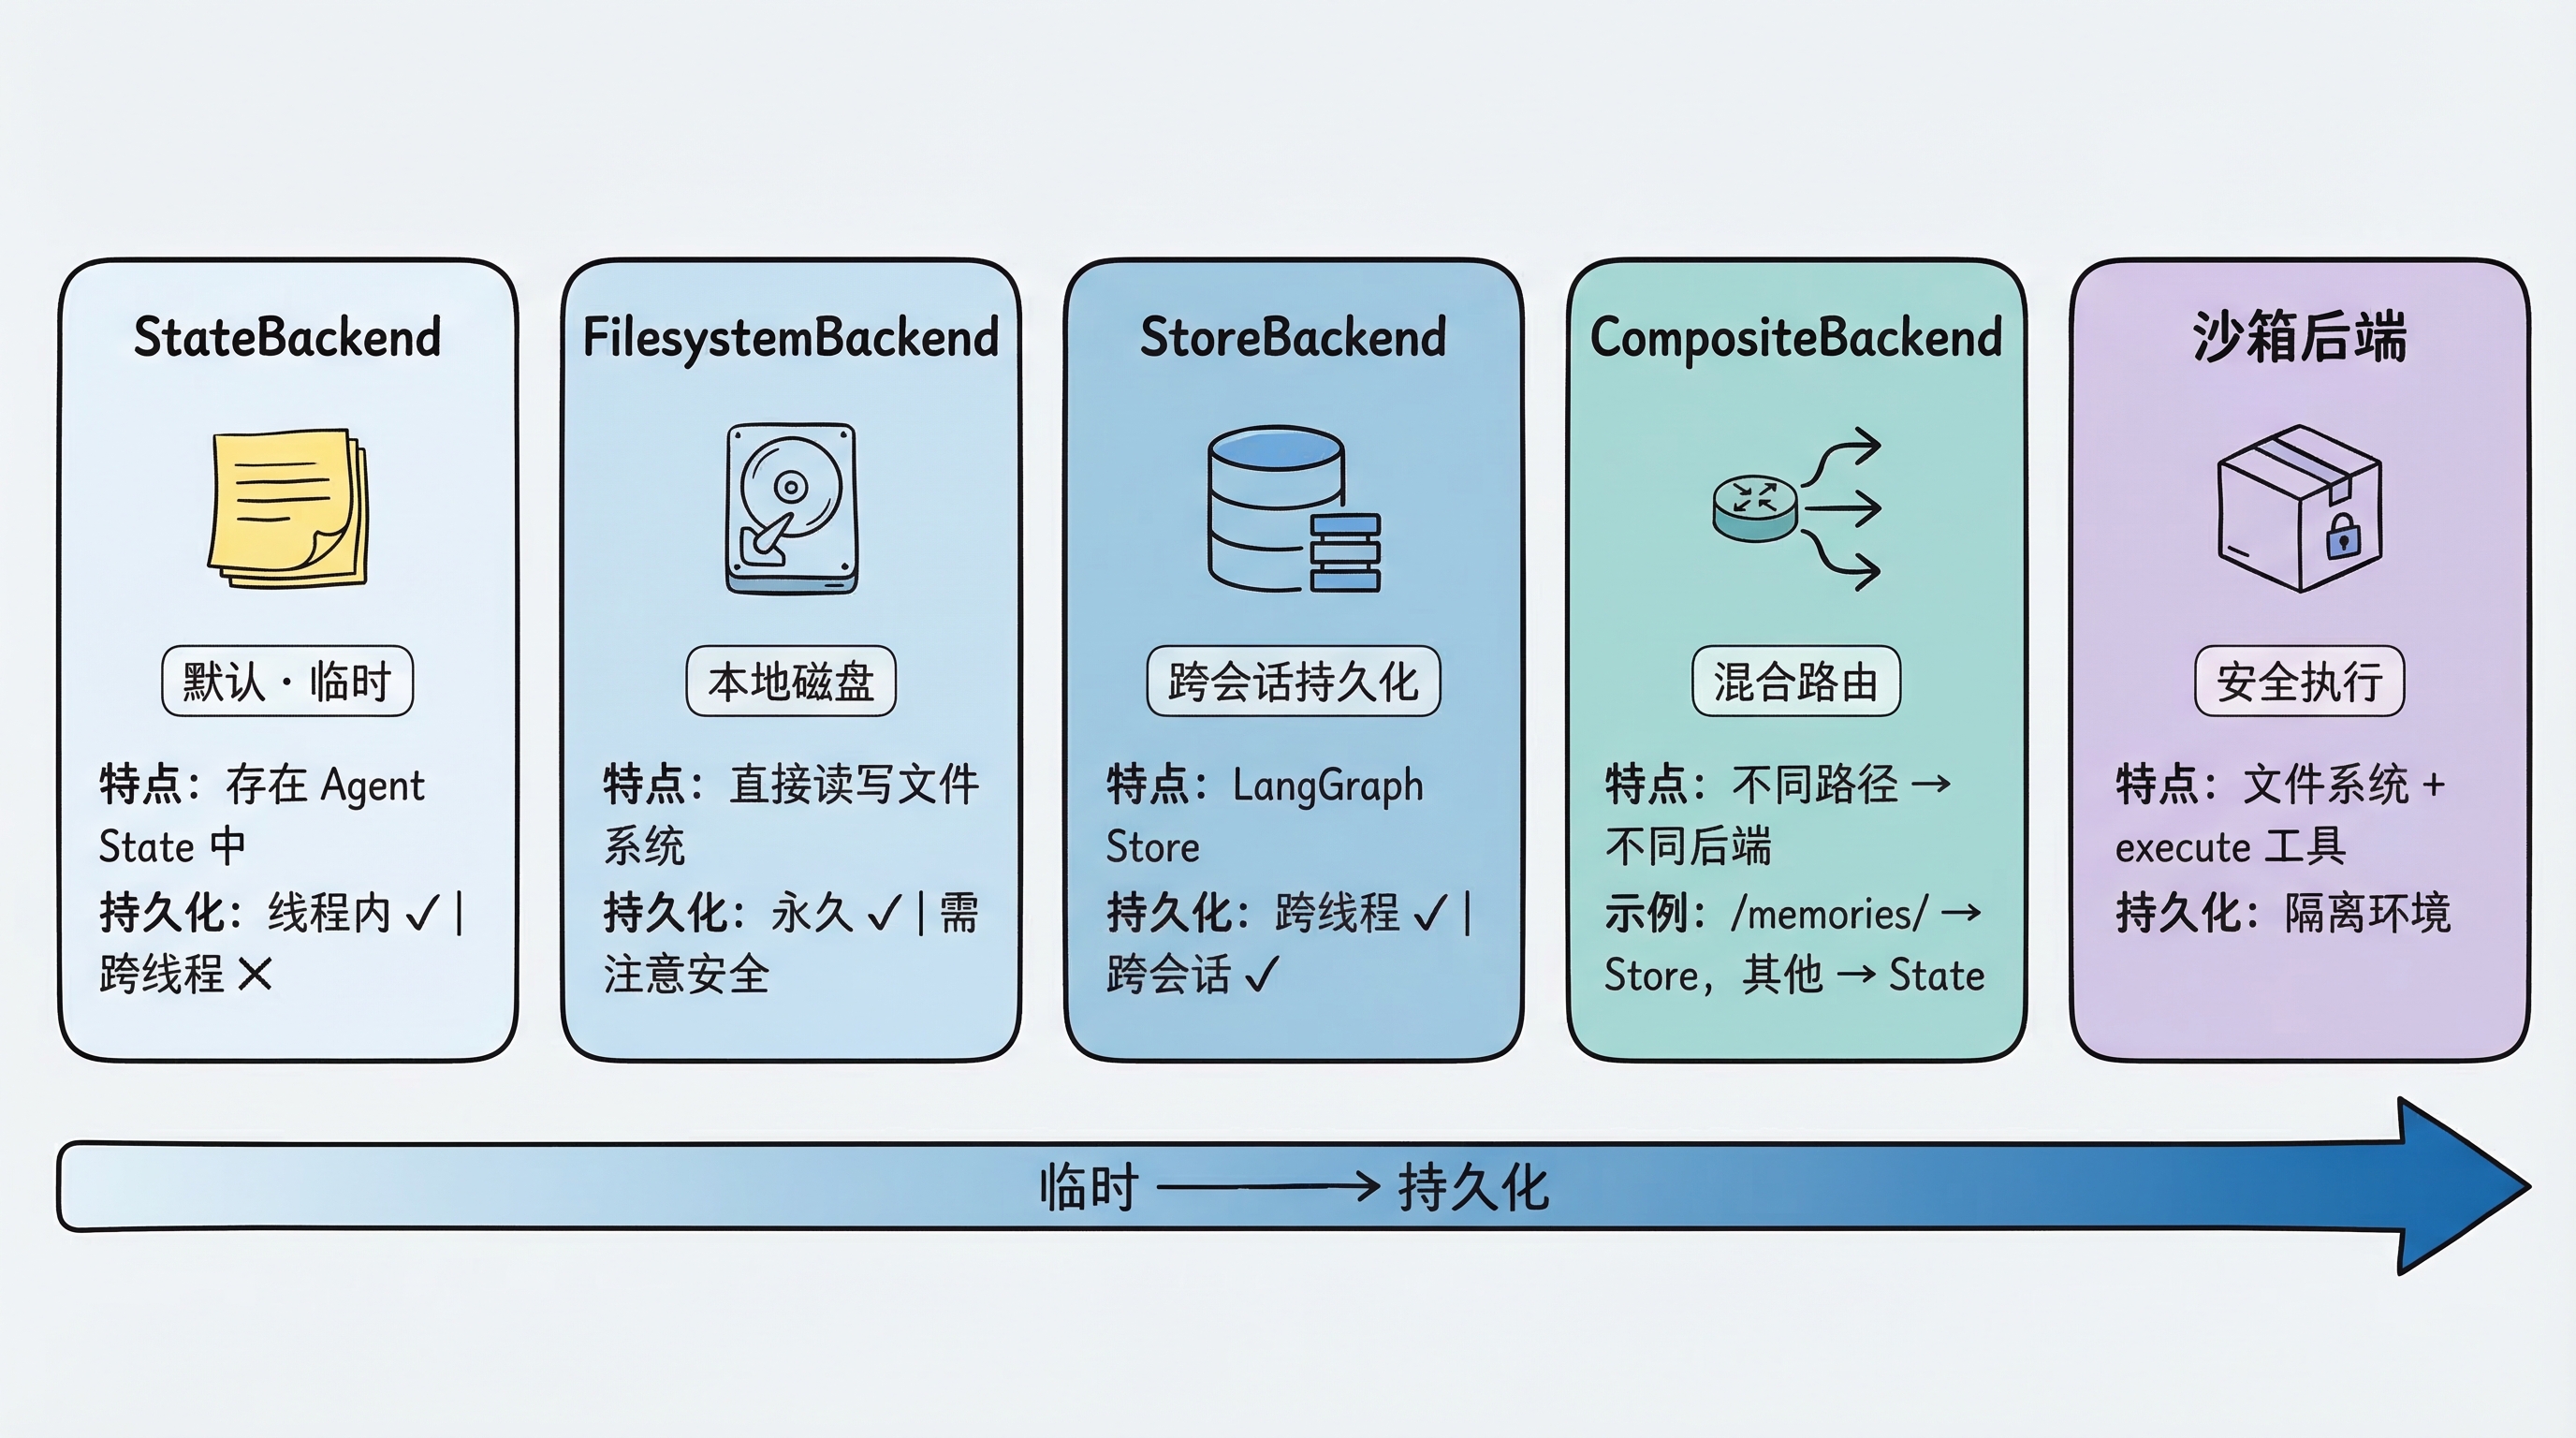
StateBackend(默认):临时存储
from deepagents import create_deep_agent

# 默认就是 StateBackend,不需要显式指定
agent = create_deep_agent(model=model)
文件存在 LangGraph 的 Agent State 中。特点:
- 同一个对话线程内持久化(多轮对话不丢失)
- 对话结束后丢失(换一个 thread 就没了)
- 主 Agent 和子 Agent 共享文件
适合场景:大多数情况下的默认选择,Agent 的”草稿纸”。
FilesystemBackend:本地磁盘
from deepagents.backends import FilesystemBackend

agent = create_deep_agent(
    model=model,
    backend=FilesystemBackend(root_dir=".", virtual_mode=True)
)文件直接读写本地文件系统。特点:
root_dir指定 Agent 可访问的根目录(必须是绝对路径)virtual_mode=True启用路径沙箱(阻止..、~等路径逃逸),强烈建议开启- 文件修改是永久的、不可逆的
适合场景:本地开发 CLI(编程助手)、CI/CD 流水线。
⚠️ 安全提示:Agent 可以读取
root_dir下所有文件,包括.env、密钥等敏感文件。Web 服务或 API 场景中切勿使用此后端,应改用沙箱后端。建议配合 Human-in-the-Loop 使用。
LocalShellBackend:本地 Shell 执行
from deepagents.backends import LocalShellBackend

agent = create_deep_agent(
    model=model,
    backend=LocalShellBackend(root_dir=".", env={"PATH": "/usr/bin:/bin"})
)
LocalShellBackend 是 FilesystemBackend 的扩展,在文件系统工具之外额外提供 execute 工具,可直接在宿主机运行 Shell 命令。特点:
- 命令通过
subprocess.run(shell=True)执行,无任何沙箱隔离 - 支持
timeout(默认 120 秒)、max_output_bytes(默认 100,000)、env等参数 root_dir作为命令的工作目录,但命令可访问系统上任意路径
适合场景:本地开发环境的编程助手、你完全信任 Agent 行为的个人开发机。
⚠️ 极高风险警告:Agent 可执行任意 Shell 命令,包括删除文件、外传数据、消耗资源。绝对不要在生产环境或多用户系统中使用。 沙箱后端是生产环境的安全替代方案。
StoreBackend:跨会话持久化
from langgraph.store.memory import InMemoryStore
from deepagents.backends import StoreBackend

agent = create_deep_agent(
    model=model,
    backend=StoreBackend(
        namespace=lambda rt: (rt.server_info.user.identity,),  # 按用户隔离数据
    ),
    store=InMemoryStore()  # 开发用;部署到 LangSmith 时可省略,平台自动提供
)
文件存在 LangGraph 的 Store 中。特点:
- 跨线程持久化——不同对话都能访问同一份文件
namespace参数控制数据隔离:lambda rt: (rt.server_info.user.identity,)按用户隔离,防止数据混用- 开发用
InMemoryStore,部署到 LangSmith 时省略store参数(平台自动配置)
适合场景:长期记忆、跨会话的用户偏好、累积的知识库。
注意:
namespace参数将在 v0.5.0 起成为必填。新代码务必显式指定。
CompositeBackend:混合路由
这是最灵活的方案——不同路径走不同后端:
from deepagents import create_deep_agent
from deepagents.backends import CompositeBackend, StateBackend, StoreBackend
from langgraph.store.memory import InMemoryStore

agent = create_deep_agent(
    model=model,
    backend=CompositeBackend(
        default=StateBackend(),            # 默认:临时存储
        routes={
            "/memories/": StoreBackend(
                namespace=lambda rt: (rt.server_info.user.identity,),
            ),
        }
    ),
    store=InMemoryStore()
)
效果:
- Agent 写入
/workspace/plan.md→ StateBackend(临时) - Agent 写入
/memories/preferences.txt→ StoreBackend(持久化,按用户隔离) ls、glob、grep自动聚合所有后端的结果,路径前缀保留
这种设计让 Agent 既有快速的”草稿纸”(State),又有持久的”记忆库”(Store),通过路径前缀自然隔离。
沙箱后端:安全代码执行
当使用沙箱后端(Modal、Daytona、Runloop 等)时,除了文件系统工具外,Agent 还会获得一个额外的 execute 工具,可以在隔离环境中执行 Shell 命令:
# 沙箱后端自动提供 execute 工具
agent = create_deep_agent(
    model=model,
    backend=sandbox  # 沙箱实例
)
# Agent 现在可以运行: execute("pip install pandas && python analyze.py")
我们会在第 9 章详细讲解沙箱。
后端选择指南
| 场景 | 推荐后端 | 理由 |
|---|---|---|
| 学习和实验 | StateBackend(默认) | 零配置,自动清理 |
| 本地编程助手 | FilesystemBackend | 直接操作项目文件 |
| 需要跨会话记忆 | CompositeBackend | 混合临时 + 持久化 |
| 需要执行代码 | 沙箱后端 | 安全隔离 |
| 生产部署 | StoreBackend 或 CompositeBackend | 持久化 + 可伸缩 |
自定义后端与安全策略
声明式权限:FilesystemPermission
最简单的路径访问控制方式是使用 FilesystemPermission,无需修改后端代码:
from deepagents import create_deep_agent, FilesystemPermission

agent = create_deep_agent(
    model=model,
    backend=CompositeBackend(
        default=StateBackend(),
        routes={
            "/memories/": StoreBackend(
                namespace=lambda rt: (rt.server_info.user.identity,),
            ),
        },
    ),
    permissions=[
        FilesystemPermission(
            operations=["write"],
            paths=["/policies/**"],
            mode="deny",           # 禁止写入 /policies/ 下的任何文件
        ),
    ],
)
权限规则在工具调用前求值,优先级:更长的路径前缀 > 较短的路径前缀。
实现自定义后端
如果内置后端不满足需求(比如要接入 S3 或 Postgres),可以实现 BackendProtocol 接口:
from deepagents.backends.protocol import (
    BackendProtocol, WriteResult, EditResult, LsResult, ReadResult, GrepResult, GlobResult,
)

class S3Backend(BackendProtocol):
    def __init__(self, bucket: str, prefix: str = ""):
        self.bucket = bucket
        self.prefix = prefix.rstrip("/")

    def ls(self, path: str) -> LsResult:
        # 列出 S3 对象,返回 FileInfo 列表
        ...

    def read(self, file_path: str, offset: int = 0, limit: int = 2000) -> ReadResult:
        # 读取 S3 对象,返回 ReadResult(file_data=...) 或 ReadResult(error=...)
        ...

    def write(self, file_path: str, content: str) -> WriteResult:
        # 写入 S3 对象,外部存储后端 files_update=None
        ...

    def edit(self, file_path: str, old_string: str, new_string: str,
             replace_all: bool = False) -> EditResult:
        # 读取 → 替换 → 写回
        ...

    def grep(self, pattern: str, path: str | None = None, glob: str | None = None) -> GrepResult:
        # 搜索匹配内容
        ...

    def glob(self, pattern: str, path: str = "/") -> GlobResult:
        # 模式匹配,返回 FileInfo 列表
        ...
BackendProtocol 要求实现 6 个方法:ls、read、write、edit、grep、glob。
安全策略:PolicyWrapper
对于需要拦截策略(速率限制、审计日志、内容检查)的场景,可以通过继承或包装后端实现:
方式一:继承现有后端
from deepagents.backends.filesystem import FilesystemBackend
from deepagents.backends.protocol import WriteResult, EditResult

class GuardedBackend(FilesystemBackend):
    def __init__(self, *, deny_prefixes: list[str], **kwargs):
        super().__init__(**kwargs)
        self.deny_prefixes = [p if p.endswith("/") else p + "/" for p in deny_prefixes]

    def write(self, file_path: str, content: str) -> WriteResult:
        if any(file_path.startswith(p) for p in self.deny_prefixes):
            return WriteResult(error=f"写入被拒绝:{file_path}")
        return super().write(file_path, content)

    def edit(self, file_path: str, old_string: str, new_string: str,
             replace_all: bool = False) -> EditResult:
        if any(file_path.startswith(p) for p in self.deny_prefixes):
            return EditResult(error=f"编辑被拒绝:{file_path}")
return super().edit(file_path, old_string, new_string, replace_all)方式二:通用包装器(适用于任何后端)
from deepagents.backends.protocol import BackendProtocol, WriteResult, EditResult

class PolicyWrapper(BackendProtocol):
    def __init__(self, inner: BackendProtocol, deny_prefixes: list[str]):
        self.inner = inner
        self.deny_prefixes = [p if p.endswith("/") else p + "/" for p in deny_prefixes]

    def _deny(self, path: str) -> bool:
        return any(path.startswith(p) for p in self.deny_prefixes)

    def ls(self, path): return self.inner.ls(path)
    def read(self, file_path, offset=0, limit=2000): return self.inner.read(file_path, offset=offset, limit=limit)
    def grep(self, pattern, path=None, glob=None): return self.inner.grep(pattern, path, glob)
    def glob(self, pattern, path="/"): return self.inner.glob(pattern, path)

    def write(self, file_path: str, content: str) -> WriteResult:
        if self._deny(file_path):
            return WriteResult(error=f"写入被拒绝:{file_path}")
        return self.inner.write(file_path, content)

    def edit(self, file_path: str, old_string: str, new_string: str,
             replace_all: bool = False) -> EditResult:
        if self._deny(file_path):
            return EditResult(error=f"编辑被拒绝:{file_path}")
        return self.inner.edit(file_path, old_string, new_string, replace_all)
小结
本章我们深入了 Deep Agents 的核心——虚拟文件系统:
- 设计哲学:让 Agent 像人一样工作——按需读取、结构化存储、搜索定位,而不是把所有信息塞进 prompt
- 六大工具:
ls、read_file、write_file、edit_file、glob、grep,覆盖了文件操作的完整生命周期 - 自动上下文管理:大结果自动卸载(>20K tokens → 文件 + 引用)、对话历史自动总结(>85% 窗口 → 摘要 + 完整记录保存到文件)
- 可插拔后端:StateBackend(临时)、FilesystemBackend(本地磁盘)、LocalShellBackend(本地 Shell)、StoreBackend(持久化)、CompositeBackend(混合路由)、沙箱后端(安全执行)
- 权限控制:
FilesystemPermission声明式权限;GuardedBackend或PolicyWrapper实现定制策略 - 废弃提醒:工厂函数模式(
lambda rt: StateBackend(rt))已废弃,直接传实例即可
下一章,我们将学习另一个核心能力——任务规划,看 write_todos 工具如何让 Agent 学会拆解复杂任务。